
On this page, you will find tips, tricks, and strategies tailored to your Discipline Priest for each boss of the following raid: Sepulcher of the First Ones. All our content is updated for World of Warcraft Patch Dragonflight 10.2.5.
Introduction
On this page, you will find Discipline Priest specific information to deal with each boss in the Sepulcher of the First Ones raid. This page assumes that you already understand most of the mechanics of each encounter. These can be found on the full raid guide, so what is contained here are details specifically tailored toward Discipline Priest and what you can do to deal with each fight as best as possible.
During the Dragonflight Pre-Patch, Castle Nathria, Sanctum of Domination, and Sepulcher of the First Ones will be simultaneously featured as Fated Raids. During this time encounters within each specific raid will include an additional mechanic and items will drop at increased item levels. If you would like to learn more general information about the Fated Raids system as a whole, please see our overview below. Otherwise, continue to use this page for specialization-specific tips.
In order to provide the most accurate raid guide possible, we teamed up with Viserio, creator of the Raid Timer Spreadsheet which can be found on his Discord
Talent Cheatsheet
You can easily import the talent tree below into the game with the following string:
- BAQAu+2Vv7op3uGggQnVDr07wABQSDOAa5ABQUSJJJJSCAAAAAAAAAAAgkGaJIgQSEhAJSioEB
Vigilant Guardian
Character Setup
We advise you to use the following Legendary against Vigilant Guardian: ![]() The Penitent One.
The Penitent One.
We recommend belonging to the Venthyr covenant for this boss.
We advise you use the following Soulbind against Vigilant Guardian: Theotar the Mad Duke
Loot Spec for this encounter: Shadow
Damage Analysis

Abilities to ramp for: ![]() Exposed Core and
Exposed Core and ![]() Core Overload
Core Overload
This fight involves multiple phases of consistent damage, each phase more
dangerous than the last, with the final phase slowly ramping up in damage
until either the boss dies or you do. Assigning a strong ramp toward the end
of the fight is ideal to extend the duration of the encounter. Prior to
the final phase, ramping for the ![]() Exposed Cores will be a good idea.
On Normal or Heroic difficulty, it is possible to end up with nothing to hit during
the Exposed Core mechanic, but this should not be the case on Mythic.
Exposed Cores will be a good idea.
On Normal or Heroic difficulty, it is possible to end up with nothing to hit during
the Exposed Core mechanic, but this should not be the case on Mythic.
Raid Frame Setup
| Spell ID | Spell Name |
|---|---|
| 367571 | |
| 366393 | |
| 360458 |
For more information, please refer to our Vigilant Guardian guide.
Skolex, the Insatiable Ravener
Character Setup
We advise you to use the following Legendary against Skolex, the Insatiable Ravener: ![]() The Penitent One.
The Penitent One.
We recommend belonging to the Venthyr covenant for this boss.
We advise you use the following Soulbind against Vigilant Guardian: Theotar the Mad Duke
Loot Spec for this encounter: Any
Damage Analysis

Abilities to ramp for: ![]() Dust Flail during high stacks
of
Dust Flail during high stacks
of ![]() Ephemera Dust
Ephemera Dust
As this fight progresses, your raid will gain an ever-increasing number of
stacks of ![]() Ephemera Dust, which deal ticking damage per stack of said
debuff. Periodically during the fight, you are able to reset your stacks via
Ephemera Dust, which deal ticking damage per stack of said
debuff. Periodically during the fight, you are able to reset your stacks via
![]() Ravening Burrow. The boss will also often cast
Ravening Burrow. The boss will also often cast ![]() Dust Flail
which deals damage to the entire raid. Targeting your strongest ramp around
the Dust Flail casts when the raid is at high stacks of Ephemera Dust is the
priority. After that, fill the rest of your ramps and Radiance casts on other
Dust Flails.
Dust Flail
which deals damage to the entire raid. Targeting your strongest ramp around
the Dust Flail casts when the raid is at high stacks of Ephemera Dust is the
priority. After that, fill the rest of your ramps and Radiance casts on other
Dust Flails.
Some people may be tempted to ramp for the Burrow itself as, at a first glance, it seems like a good spot to target. However, the damage of the burrow itself is not very high. Its much more important and lucrative to ramp prior to the Burrow during the high stacks as described above.
Raid Frame Setup
| Spell ID | Spell Name |
|---|---|
| 359778 | |
| 364522 |
For more information, please refer to our Skolex, the Insatiable Ravener guide.
Artificer Xy'Mox
Character Setup
We advise you to use the following Legendary against Artificer Xy'mox: ![]() The Penitent One.
The Penitent One.
We recommend belonging to the Venthyr covenant for this boss.
We advise you use the following Soulbind against Artificer Xy'mox: Theotar the Mad Duke
Loot Spec for this encounter: Disc/Holy
Damage Analysis

Abilities to ramp for: ![]() Glyph of Relocation and
Glyph of Relocation and
![]() Genesis Supernova
Genesis Supernova
While this fight has fairly constant damage due to
![]() Hyperlight Sparknova, the most dangerous damage during the
encounter is due to the
Hyperlight Sparknova, the most dangerous damage during the
encounter is due to the ![]() Glyph of Relocation mechanic and the
intermission damage of
Glyph of Relocation mechanic and the
intermission damage of ![]() Genesis Supernova. Due to the fact that the
Glyph of Relocation mechanic has forced movement as a part of it, you need to be
very exact with your ramp timing so that you have already completed both radiance
casts at a minimum, ideally your
Genesis Supernova. Due to the fact that the
Glyph of Relocation mechanic has forced movement as a part of it, you need to be
very exact with your ramp timing so that you have already completed both radiance
casts at a minimum, ideally your ![]() Schism as well, prior to the pull-in
happening. If you do not, you run the risk of your early
Schism as well, prior to the pull-in
happening. If you do not, you run the risk of your early ![]() Atonements
falling off before you can cast
Atonements
falling off before you can cast ![]() Evangelism as well as just missing the
damage event all together.
Evangelism as well as just missing the
damage event all together.
Raid Frame Setup
| Spell ID | Spell Name |
|---|---|
| 362850 | |
| 362803 | |
| 363114 |
Dausegne, the Fallen Oracle
Character Setup
We advise you to use the following Legendary against Dausegne, the Fallen Oracle: ![]() The Penitent One.
The Penitent One.
We recommend belonging to the Venthyr covenant for this boss.
Note: While this fight has very good timings for Kyrian which may provide a higher HPS Ceiling, most mythic
progress strategies involve utilizing the mobility of either ![]() Door of Shadows or
Door of Shadows or
![]() Soulshape to skip some of the damage from
Soulshape to skip some of the damage from ![]() Disintegration Halo. If you are doing this
fight on a lower difficulty or you feel you can survive without Door of Shadows, you can consider running
Kyrian with
Disintegration Halo. If you are doing this
fight on a lower difficulty or you feel you can survive without Door of Shadows, you can consider running
Kyrian with ![]() Clarity of Mind and Pelagos instead.
Clarity of Mind and Pelagos instead.
We advise you use the following Soulbind against Dausegne, the Fallen Oracle: Theotar the Mad Duke
Loot Spec for this encounter: Disc/Holy
Damage Analysis

Abilities to ramp for: ![]() Inevitable Dominion
Inevitable Dominion
![]() Inevitable Dominion will be the most important target for your
primary ramps on this fight, so ensure you have your strongest CDs available for
as many of these casts as possible. After that, both the tank explosion
Inevitable Dominion will be the most important target for your
primary ramps on this fight, so ensure you have your strongest CDs available for
as many of these casts as possible. After that, both the tank explosion
![]() Unleashed Infusion as well as the damage from the
Unleashed Infusion as well as the damage from the
![]() Disintegration Halo will be your mini ramp and spare radiance
targets.
Disintegration Halo will be your mini ramp and spare radiance
targets.
Raid Frame Setup
| Spell ID | Spell Name |
|---|---|
| 360959 |
For more information, please refer to our Dausegne, the Fallen Oracle guide.
Prototype Pantheon
Character Setup
We advise you to use the following Legendary against Prototype Pantheon: ![]() The Penitent One.
The Penitent One.
We recommend belonging to the Venthyr covenant for this boss.
We advise you use the following Soulbind against Prototype Pantheon: Theotar the Mad Duke
Loot Spec for this encounter: Any
Damage Analysis

Abilities to ramp for: ![]() Windswept Wings and
Windswept Wings and
![]() Hand of Destruction
Hand of Destruction
This is a multi-phase fight with the bulk of the damage coming during Phases
Two and Three while the Prototype of Absolution is active due to
![]() Burden of Sin, which is massive ticking damage on the raid.
During Phase One, using a ramp on
Burden of Sin, which is massive ticking damage on the raid.
During Phase One, using a ramp on ![]() Windswept Wings is not a terrible idea,
but your strong ramps should be saved for
Windswept Wings is not a terrible idea,
but your strong ramps should be saved for ![]() Hand of Destruction if possible.
If you are struggling to ramp for Hand of Destruction itself, ramp either
just before or just after it to ensure the raid is topped off going into it
or picked up after the fact.
Hand of Destruction if possible.
If you are struggling to ramp for Hand of Destruction itself, ramp either
just before or just after it to ensure the raid is topped off going into it
or picked up after the fact.
If running Venthyr, make sure you cast ![]() Mindgames on Prototype of Absolution if he is
active to ensure that you recieve your
Mindgames on Prototype of Absolution if he is
active to ensure that you recieve your ![]() Shadow Word: Manipulation stacks as soon as possible
as the other bosses don't consistently trigger damage events to consume the debuff.
Shadow Word: Manipulation stacks as soon as possible
as the other bosses don't consistently trigger damage events to consume the debuff.
Raid Frame Setup
| Spell ID | Spell Name |
|---|---|
| 360687 | |
| 361608 | |
| 360295 | |
| 360259 |
For more information, please refer to our Prototype Pantheon guide.
Lihuvim, Principal Architect
Character Setup
We advise you to use the following Legendary against Lihuvim, Principal Architect: ![]() The Penitent One.
The Penitent One.
We recommend belonging to the Venthyr covenant for this boss.
We advise you use the following Soulbind against Lihuvim, Principal Architect: Theotar the Mad Duke
Loot Spec for this encounter: Disc/Holy
Damage Analysis
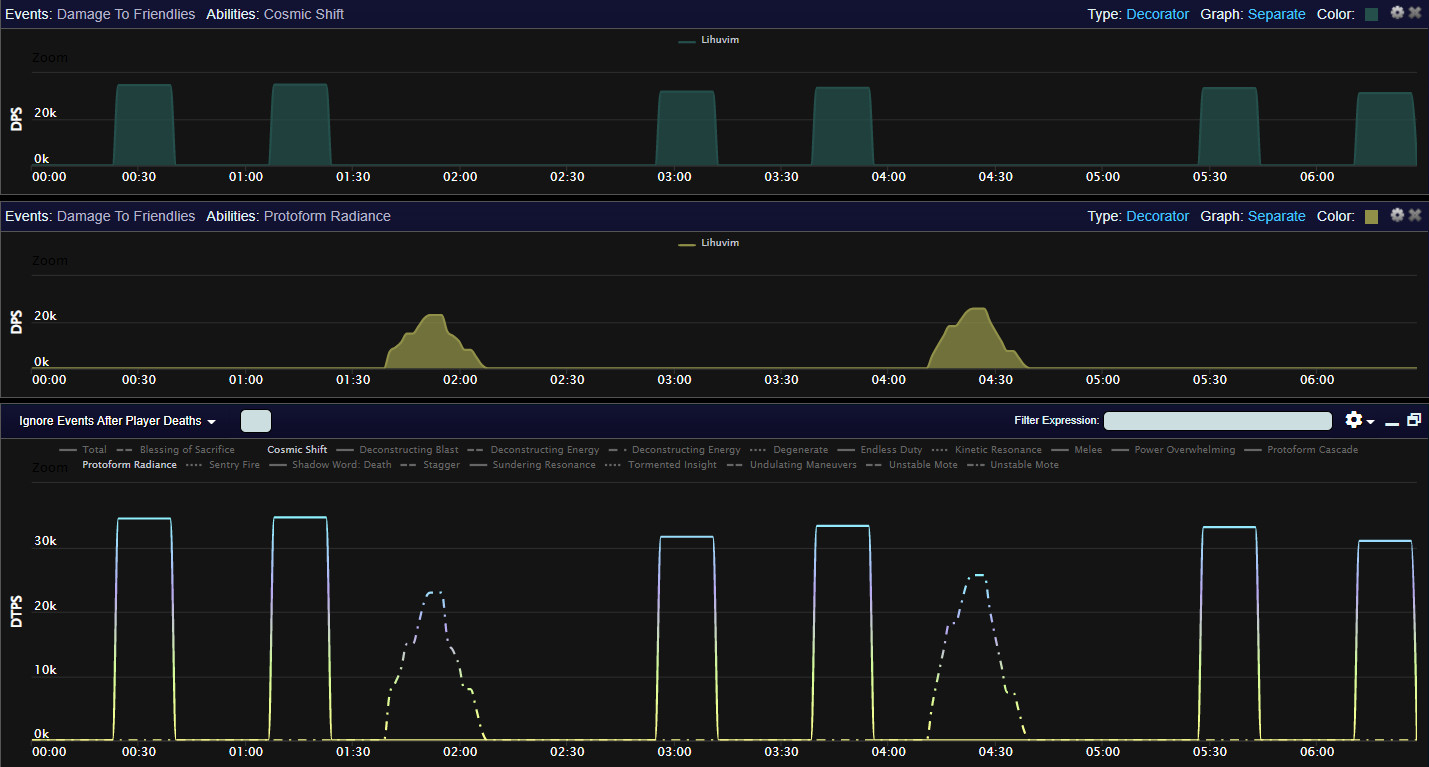
Abilities to ramp for: ![]() Cosmic Shift or
Cosmic Shift or
![]() Protoform Radiance
Protoform Radiance
Due to ![]() Cosmic Shift involving a small knockback, if you are
ramping for it make sure you have completed your hard casts by the time the
knockback happens so you are not scrambling after the fact and miss all the damage.
For
Cosmic Shift involving a small knockback, if you are
ramping for it make sure you have completed your hard casts by the time the
knockback happens so you are not scrambling after the fact and miss all the damage.
For ![]() Protoform Radiance, ramp with instants while you run so that
you can use
Protoform Radiance, ramp with instants while you run so that
you can use ![]() Evangelism when the phase starts so your Atonements last
for the majority of the damage.
Evangelism when the phase starts so your Atonements last
for the majority of the damage.
For more information, please refer to our Lihuvim, Principal Architect guide.
Halondrus the Reclaimer
Character Setup
We advise you to use the following Legendary against Halondrus the Reclaimer: ![]() The Penitent One.
The Penitent One.
We recommend belonging to the Venthyr covenant for this boss.
Note: If your guild is doing the strategy that involves stopping DPS
so that three minute cooldowns may be up for the second ![]() Reclaim cast,
Kyrian will be competitive with Venthyr.
Reclaim cast,
Kyrian will be competitive with Venthyr.
We advise you use the following Soulbind against Halondrus the Reclaimer: Theotar the Mad Duke
Loot Spec for this encounter: Shadow
Damage Analysis

Abilities to ramp for: ![]() Earthbreaker Missiles,
Earthbreaker Missiles,
![]() Reclaim, and
Reclaim, and ![]() Eternity Overdrive
Eternity Overdrive
![]() Reclaim is the highest period of damage during the encounter during the first
few phases, so it remains an obvious choice for strong ramps. You will need
to be careful when applying
Reclaim is the highest period of damage during the encounter during the first
few phases, so it remains an obvious choice for strong ramps. You will need
to be careful when applying ![]() Atonement to your raid via
Atonement to your raid via
![]() Power Word: Radiance due to how spread out the raid generally is. The
Power Word: Radiance due to how spread out the raid generally is. The
![]() Earthbreaker Missiles will be great targets for smaller ramps like
mini ramps. Damage ramps up quite a bit in the last phase via
Earthbreaker Missiles will be great targets for smaller ramps like
mini ramps. Damage ramps up quite a bit in the last phase via ![]() Eternity Overdrive
and the increased frequency of
Eternity Overdrive
and the increased frequency of ![]() Ephemeral Burst damage instances, so
using cooldowns around a set of missiles in this phase will also pick up a ton
of other healing from these mechanics as well.
Ephemeral Burst damage instances, so
using cooldowns around a set of missiles in this phase will also pick up a ton
of other healing from these mechanics as well.
Raid Frame Setup
| Spell ID | Spell Name |
|---|---|
| 365294 | |
| 368957 |
For more information, please refer to our Halondrus the Reclaimer guide.
Anduin Wrynn
Character Setup
We advise you to use the following Legendary against Anduin Wrynn: ![]() The Penitent One.
The Penitent One.
We recommend belonging to the Venthyr covenant for this boss.
We advise you use the following Soulbind against Anduin Wrynn: Theotar the Mad Duke
Loot Spec for this encounter: Shadow
Damage Analysis
Abilities to ramp for: ![]() Befouled Barrier,
Befouled Barrier,
![]() Hopebreaker, and
Hopebreaker, and ![]() Empowered Hopebreaker
Empowered Hopebreaker
Raid Frame Setup
| Spell ID | Spell Name |
|---|---|
| 366849 | |
| 365293 |
For more information, please refer to our Anduin Wrynn guide.
Lords of Dread
Character Setup
We advise you to use the following Legendary against Lords of Dread: ![]() Clarity of Mind.
Clarity of Mind.
We recommend belonging to the Kyrian covenant for this boss.
We advise you use the following Soulbind against Lords of Dread: Pelagos
Loot Spec for this encounter: Any
Damage Analysis
Abilities to ramp for: ![]() Unto Darkness/p>
Unto Darkness/p>
Raid Frame Setup
| Spell ID | Spell Name |
|---|---|
| 360006 | |
| 360148 | |
| 360241 | |
| 360284 |
For more information, please refer to our Lords of Dread guide.
Rygelon
Character Setup
We advise you to use the following Legendary against Rygelon: ![]() The Penitent One.
The Penitent One.
We recommend belonging to the Venthyr covenant for this boss.
We advise you use the following Soulbind against Rygelon: Theotar the Mad Duke
Loot Spec for this encounter: Any
Damage Analysis
Abilities to ramp for: ![]() Dark Collapse and any point during
the downstairs phase.
Dark Collapse and any point during
the downstairs phase.
Raid Frame Setup
| Spell ID | Spell Name |
|---|---|
| 361548 | |
| 362081 | |
| 362088 |
For more information, please refer to our Rygelon guide.
The Jailer
Character Setup
We advise you to use the following Legendary against The Jailer: ![]() The Penitent One.
The Penitent One.
We recommend belonging to the Venthyr covenant for this boss.
We advise you use the following Soulbind against The Jailer, Zovaal: Theotar the Mad Duke
Loot Spec for this encounter: Any
Damage Analysis
Abilities to ramp for: ![]() Surging Azerite,
Surging Azerite,
![]() Unholy Eruption, and
Unholy Eruption, and ![]() Torment.
Torment.
Raid Frame Setup
| Spell ID | Spell Name |
|---|---|
| 360282 | |
| 265151 | |
| 366030 | |
| 362194 | |
| 359868 | |
| 360565 | |
| 365153 | |
| 365219 |
For more information, please refer to our The Jailer guide.
Changelog
- 25 Oct. 2022: Updated for Dragonflight pre-patch.